Section A: Begin here...
- Buy yourself a weather station. Vintners.Net recommends the
Davis Vantage Vue as the most affordable, yet of high quality
station for our PMI network.
- I just got a complete Vantage Vue setup for $408.20 (including
shipping) (Nov-2019). I got it through WeatherShack.com, they
have a low price match guarantee, be sure to google around and
use it.
- If you want to use a different system, all that matters is that
Cumulus software will work with it. Go
to their website
(Sandaysoft.com) to check for compatibility.
Do NOT plug the base station into the
computer yet. If you do this, Windows will attempt to load
it's own driver for you - you do not want the MS driver getting in
your way. Additionally, you will not be using the station vendor's
software, so don't use their installation disk.
While waiting for your weather station to arrive, you can do the
next few steps.
Section B: Create WUnderground account:
- Go to http://www.WUnderground.com/
- If you have an account already, log in, if not, go ahead and create a new one.
- Under My Profile, take "my devices".
- Add new.
- Click Personal.
- Give it your location, it can take a street address. Be sure to
jigger the position on the map to the actual location.
- Hit Ok and Next.
- Make up a name, I'd recommend including the word vineyard - this
is what will show up in a search for stations on WU.
- Accept and Next.
- I'd suggest yes on notifications.
- Jot down the KWA name you're given, and the password they'll have
you make up; you'll need these below.
- Also jot down the Lat/Lon/Alt that it gives you, you'll need these
again later as well.
- Txt/email MikeL with the KWA name you were given, and the "key"
they provide you, these will become your user/pswd for your
Vintners.Net PMI account.
Section C: Create an account at Vintners.net PMI website:
-
Go to: https://www.Vintners.net/weatherstation/pmi.php
- Click "Create account". Choose a username which will also be
your display name. You must provide an email address, and a pswd
with confirmation.
- You'll be taken to the help page and will be instructed to click
on "manage blocks" and to create a named block.
- Use the Station list at the top right to decide which station
you'll use to reference.
- Choose short (just a few letters - these are column headers)
names for your blocks. If you only have one, you'll still need to
give it a name. There should be at least as many blocks as you
are able to spray in a day. Typically a block is a single
varietal, each varietal being another block. If multiple blocks,
seperate the names with comma.
- Now go into "Preferences" and configure options. You'll
probably want to provide a TXT number for notifications. If
there's a website for your vineyard, you can put that in URL.
Note that there's test buttons for email and TXT - you'll find
them in the Help screen.
- When MikeL has configured your account for your weather station,
you'll have an additional Manage Station option that you'll want
to confirm. It shows the contents of
the
sysparmsT.htm file (see below). Be sure it has
the correct WUnderground KWA.....ddd name.
Section D: Give this computer a decent name:
- (Win10) Windows-Key-r
Enter "SystemPropertiesAdvanced"
- (Win XP) Start button->Control Panel
Double-click System
- Click "Computer Name" tab.
- Click "Change" button to "Rename this computer".
- I recommend the initials of your vineyard, or the
KWA name from WU (above), followed by "wthr". Check with MikeL.
- You'll need to reboot for this change to take effect.
Section E: [IMPORTANT!] Set system to automatically maintain correct time:
- (Win XP - 10) right-click on the time on the screen bottom-right
- Click "adjust date/time"
- Make sure "set time automatically" is set to ON.
- Win7-Win8, right-click on clock, on "server" tab, set a time server to "time.nist.gov".
- Old, Old Windows (pre-Win XP),
download nistime-32bit.exe and
follow it's install directions, info
at nist.gov
(scroll down to near bottom of page).
Section F: Setup procedure:
- FYI: All descriptions/directions below assume Davis Vantage
Vue.
- Follow your station's installation instructions for the
instrument cluster and base station. Do not connect it to the
computer yet.
- Get your instrument cluster talking to the base station.
- Install your instrument cluster in your vineyard.
- Install your base station somewhere within USB cable reach of an
internet connected computer, preferably one that is left running
permanently.
- Grab a piece of scratch paper and a pen, and jot down the make
and model of your weather station - you'll need this and we'll
be making other notes later.
Section G: Get the weather station working with computer. (Davis Vantage Vue)
- Download
cp210x.zip.
- In File Explorer, unzip (extract) this onto your HD somewhere
(C:\TEMP\ is a good choice).
- In File Explorer, go into this
cp210x directory.
- If you're on a modern 64bit machine, run (double-click
on)
CP210xVCPInstaller_x64.exe.
- Old 32bit machine do the "x86" version.
Section H: Install Cumulus.
- Reminder - if it's in, UNPLUG the base
station USB. Do NOT plug this back in until you've
made it through the following config steps.
- Note! We are using an old version of Cumulus -
install the old version archived below on this server, do
not install the modern version from the vendor.
- Download
CumulusSetup.exe
(local copy of version 1.9.4).
- For reference, Cumulus was created by Sandaysoft.com.
We are grateful for their work, as this is necessary for our data uploads.
- Run it and follow the online install. Default
everything at this point.
Section I: Get the weather station working with computer. (Davis Vantage Vue)
- Start Cumulus
- Go to Configuration->Station screen. screen shot
- Select your station type.
- Most important! Be sure to check that the
Units are Inches and Fahrenheit, mph, etc.
- Select serial communications (yes, I know, this is a USB
connection - trust me).
- Set serial port to COM port 3.
- Make sure to turn OFF Close On Suspend, turn ON Stop 2nd
Instance, and Restart if Unplugged.
- Be sure to enter your Lat/Lon/Alt, Name and Desc that
you jotted down earlier. You' need to use an internet
to convert the WU decimal notation to deg/mins/secs. Note
that negative longitude is "West".
- When you save, you'll get a pause and an "-32701
initialize error". Ignore this for now, it's just
because the base station is not plugged in - we'll get
back this later.
- Close Cumulus, then restart it. You'll get the
"-32701" error again, just hit Ok.
- Go back in to Station screen, and check that the above
changes were saved.
- Once more - make sure you're set for
Fahrenheit/Inches/mph. If these are set incorrectly, when
the first data flows in, your weather record values will be
messed up.
(This can be fixed, but it could cause loss
of daily data so if necessary, you will want to do it ASAP -
contact MikeL for help.)
Section J: NOW you can plug the base station USB
in.
If not already running, start Cumulus.
- If you get a warning about "cannot initialize error -32701",
you may be able to fix it by correcting the COM port in the
Station config screen. Try port 3 first, if that doesn't
work try 1, 2, 4. (See Section I above.)
- If this doesn't fix it, perhaps you did not get the pigtail
plugged in correctly. Open the back of the base station, pull the
plug, make sure there are no bent pins, plug it back in. It takes a
very firm press to get it to seat properly.
- Absolute last resort: If all else has failed, install
original
WeatherLink_Setup.msi.
Do not use the latest version from Davis as this is a
subscription-based setup; use the local version on this server.
Once this is working, go to the WeatherLink config screen, find
which com port is in use, then shutdown WeatherLink, go into
Cumulus Station config, and set this COM port.
Section K: Configure auto start on power up:
Directions for Windows 10
- Set Windows to auto-login:
- Windows-Key-r
- Enter "netplwiz".
- Uncheck "must log in".
- Save/close.
- If "must log in" isn't present, google "microsoft
support 324737" and follow directions there.
- Set to auto-start Cumulus:
- Windows-key-r
- Enter "shell:common startup".
- Open another Windows File Explorer, navigate to
C:\Cumulus\.
- Right-mouse drag-n-drop from Cumulus.exe into
startup folder.
- If you get an error about "not admin, create on desktop?",
go ahead and say yes, then do it again, this time right-mouse
drag from the new desktop icon and move to startup folder.
This time it'll go. (All you're doing is creating a
"shortcut" to the Cumulus.exe file, in the system startup
folder.)
Shutdown/reboot to make sure that auto login and Cumulus auto start
are working.
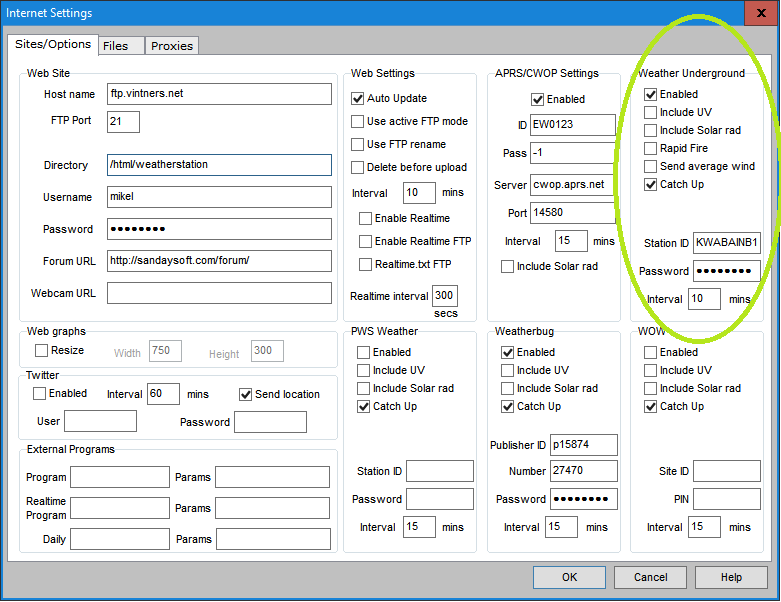
Section L: Configure Cumulus generic: (screen shot, see lime green oval)
Set to write to Weather Underground
- Cumulus->Configuration->Internet Settings
- Sites/Options tab
- Weather Underground:
Enabled: checked
others unchecked
Catch up: checked
Enter Station ID from above (KWA.....###)
Enter Station "key" from WU website from above
Interval: 10 or 15 mins
You are welcome to set up to contribute your data to other
stations. ("WeatherBug" is a popular phone app, so I contribute
to that one.) It's pretty much the same as you did with WU
in Section B, then put the info from those other websites into
the appropriate block on the Internet Configuration screen.
Note that if you choose to contribute data to CWOP, you will
have to open a special firewall port.
See No updates
problem page for details.
Section M: From here on out we're doing stuff specific to PMI.
Set to write files for PMI:
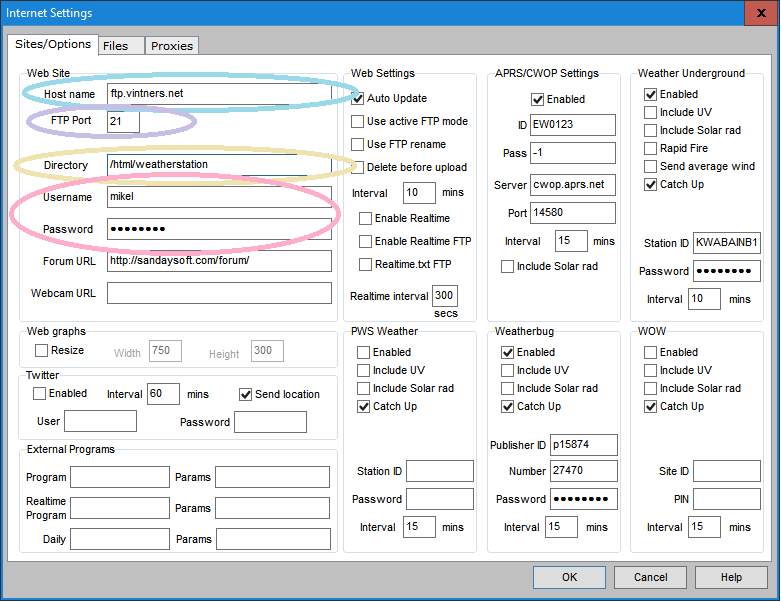
Cumulus configuration->Internet Settings
Sites/Options tab (screen shot):
- ftp server "Host name":
ftp.vintners.net (light-blue highlight)
- ftp port: default to
21 (lavender highlight)
- initial working dir "Directory":
/html/weatherstation/ (yellow highlight)
- Username: (provided by MikeL) - probably your KWA # from WU (in all lower case) (pink highlight)
- Password: (provided by MikeL) - probably the "station key" from WU above (pink highlight)
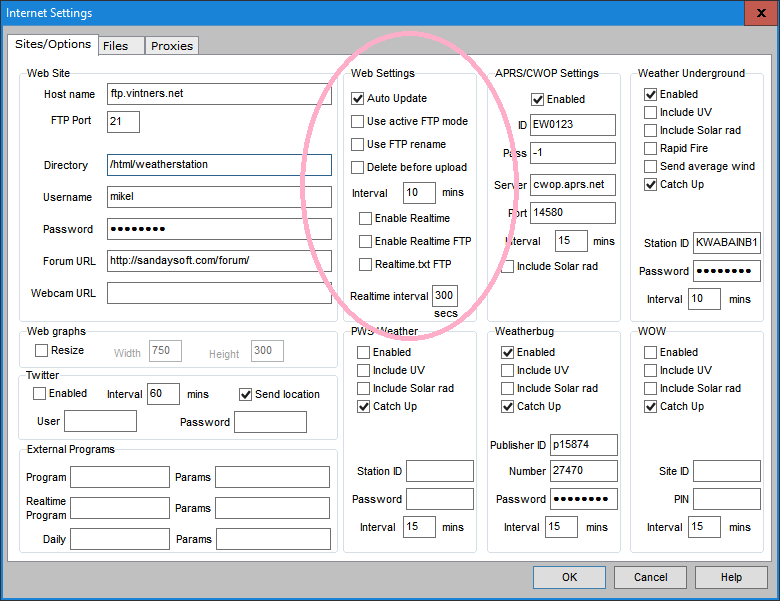
- Web Settings: (screen shot, pink highlight):
Auto Update: checked
others don't matter
interval: 10 or 15 mins is good
all Real time entries: unchecked
Section N:
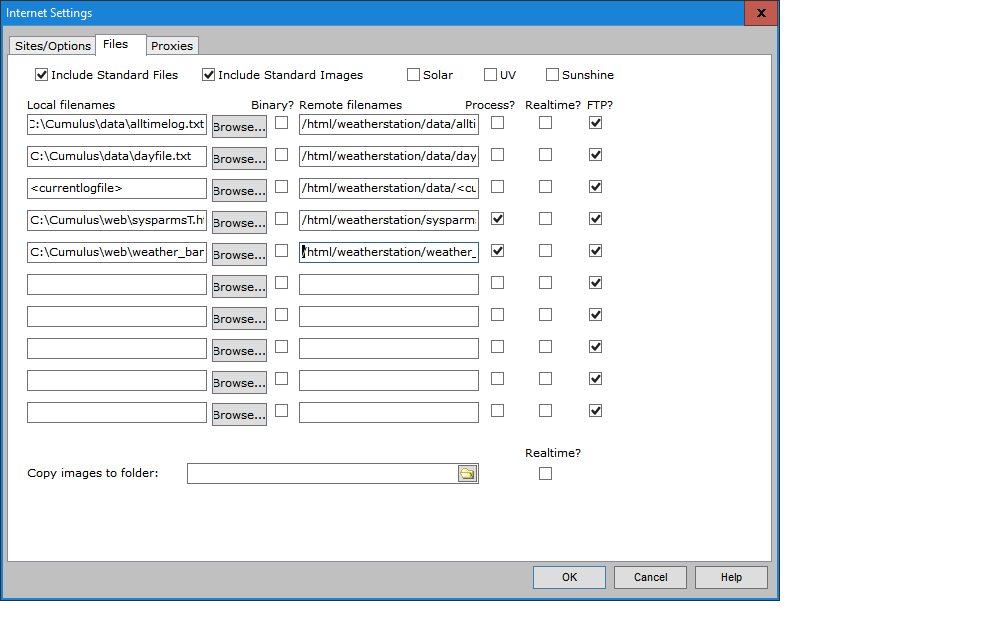
Cumulus Internet Files screen (screen shot)
| Local filenames | Remote filenames | Process? | Realtime? | ftp? | utf-8 |
C:\Cumulus\data\alltimelog.txt | /html/weatherstation/data/alltimelog.txt | | | checked | |
C:\Cumulus\data\dayfile.txt | /html/weatherstation/data/dayfile.txt | | | checked | |
<currentlogfile> | /html/weatherstation/data/<currentlogfile> | | | checked | |
C:\Cumulus\web\sysparmsT.htm | /html/weatherstation/sysparms.htm | checked | | checked | |
C:\Cumulus\web\weather_banner.htin | /html/weatherstation/weather_banner.htin | checked | | checked | |
Section O:
Download sysparmsT.htm
- Save it into
C:\Cumulus\web\ directory (be sure it
is saved with suffix ".htm").
- This file is displayed in the PMI "Manage Station" screen. It allows
you to see certain values that would otherwise not be available,
e.g. battery level in the base station and of the instrument cluster.
- It is also used by the PMI software to alert you of problems,
like any error message from the Cumulus software, or low battery
levels.
- If you have problems with this, it's ok to skip it for now,
though you may have to back this filename out of the previous Cumulus
Internet Files config (above).
Section P:
Download weather_banner.htin
- Save into
C:\Cumulus\web\ directory
(be sure it saves with suffix ".htin").
- Edit this file and change anything appropriate, e.g. station name and city.
- Find it using the File Explorer and double-click on it. Windows
will probably not know how to edit this file - choose "select
from list", then "notepad". Allow it to "always use this
program for this type of file".
- Fix:
- Name of vineyard
- City/state of vineyard location
- KWA.....ddd in WUnderground "history" URL
- City/state in WUnderground "forecast" URL
- As above, the software can run without this file; if
necessary, skip for now, and back this filename out of the Cumulus
Internet Files config (above).
- Edit the file
C:\Cumulus\indexT.htm and remove
the solar radiation/evapotranspiration block in the middle.
Section Q: Note! MikeL may have done this next part
for you on the server.
Use an ftp program (recommended "FileZilla") to upload all files
from C:\Cumulus\webfiles\
- Upload to website in your
/html/weatherstation/
directory. Do not nest them into a "webfiles" dir, they should be
in the "weatherstation" dir.
- ftp settings are the same ones you used in the Cumulus
Configuration Internet screen above.
-
The following are the ones that make your "console website"
look pretty:
CumulusRealtime.swf
weatherstyle.css
wz_jsgraphics.js
images/picture.jpg
- Note the last file must be nested into an "images" dir.
- Be sure that the "images" directory and it's contents uploaded
- some ftp apps won't automatically do recursive uploads.
- Be sure that the "dbimages" directory and it's contents
uploaded - some ftp apps won't automatically do recursive
uploads.
- You can skip this entire section for now, the only consequence
is that your "console" screen at the web server won't be as
pretty. We can fix that later.
Section R:
Now go to Console Problems to
check if all is right.
If you're not getting any obvious outgoing data, go
to No updates problem page
for help.
|