 However, ther real problem is that even though the power supply block
says directly on it "rainproof", they are not.
In the future, I will put all these connectors into
a Sockitbox
(~$25).
However, ther real problem is that even though the power supply block
says directly on it "rainproof", they are not.
In the future, I will put all these connectors into
a Sockitbox
(~$25). I purchased a bunch of
the Homeleo
500 LED Outdoor String Lights, 100 meters (~$24). Mine has a
separate flasher/controller from power supply.
I purchased a bunch of
the Homeleo
500 LED Outdoor String Lights, 100 meters (~$24). Mine has a
separate flasher/controller from power supply.I have a vineyard and I'm running these along the top wire of the rows. My rows are 100' long, 7' apart, so these strings do 3 rows each, a little bit short.
The first problem is that these things are seriously inconsistent in overall length (I don't care much about the bulb spacing). Although I'm running the same length, there will be some rows with extra bulbs (visible in photo dangling down at the row end). I will have to put black electrical tape over each bulb in order to hide them as they otherwise mess up the overall row pattern.
I had a lot of trouble with these controllers failing, and I
discovered that I could simply remove the controller and the string
would still light, with the caveat that only every other bulb would be
lit. I was ok with that. However! You don't want to do
that!. The problem is that these strings are meant to be cycled
on/off much faster than you can see, they're actually runninng on AC -
every other LED is forward, the alternate backward so that at any
instant only every other LED is on. They are dimmed by having a
lesser on-time. The moral of the story is that if you run them on DC
(what's coming directly out of the power supply), every other LED will
be on 100% which will exceed the power supply limits, causing it to
burn out eventually.
However, ther real problem is that even though the power supply block
says directly on it "rainproof", they are not.
In the future, I will put all these connectors into
a Sockitbox
(~$25).
DISCLAIMER! I am not recommending that you try to fix/repair these yourself - I cannot be held in any way responsible for your success, failure or damages in attempting such work. That said, I will show you what I did.
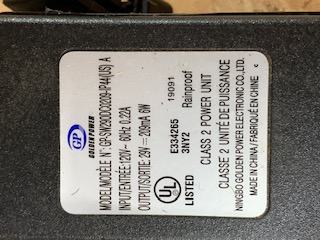
Power supply part number GP-SW290DC0209-IP44(US)
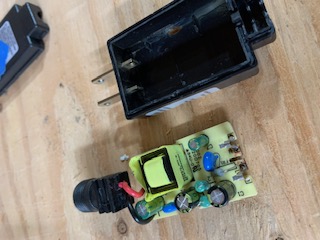
Getting it open seems daunting, but it's really not. Just hit it with a hammer (against concrete), until it snaps open. Hit it along the seam, on either wide side, flipping it back and forth. Hit it pretty hard. After 8-10 hits, you'll suddenly hear a different sound when you hit it - this is where the side pops free. Video of me doing this (23secs .mov format 51mb), listen carefully with sound on so you can hear that final pop. Now get a mid-sized screwdriver and pry it the rest of the way open.
This thing is actually a clever design, and comes apart easily. Simply pull the output connector up out of it's slot, and the board will follow as it's not mounted to anything.
The typical problem is that water has leaked in around the power entrance prongs. The connection where the spring metal on the circuit board presses against the power prong, goes bad as the prong will eventually rust. Simply scrape both sides of both prongs on the inside with fine grit sandpaper or with steel wool to clear the rust. Next, do the same on the inside of the upside-down-V shaped spring metal piece on the circuit board that connects to the prong. Lastly, squeeze each V-piece in the middle to ensure that it will press against it's prong. Be sure to blow any metal shavings out of the case before reassembling. Video of me doing this (1:07 .mov format, 147mb). As you press the board back in, you should feel resistance as the V-pieces press against the prongs. Test it out, and if it works, glue it shut for re-use.
I had 7 (seven) of these cheap pieces of junk fail. Using
the above techniques I was able to repair one of them. One had an
obviously blown capacitor (probably burned out by running without
controller), another had a rusted out chip on the back (obviously
water leakage), the rest looked ok, but did not come back (possibly no
controller burnout). So, now that I had to replace the dang things, I
had to struggle to find an equivalent. Bear in mind that mine had a
separate power block and flasher controller. It was actually cheaper
to buy a
replacement power
supply with built-in controller than to replace the power supply
alone. Be sure to get the same output voltage (must be the same) and
current/wattage (must be the same or higher) as your original.
Search keywords: DIY, maker, no user servicable parts, hack, fix, repair